Basic employee and employee group details, group memberships, authorisations, application modules access and data access are entered here. Select Master data | Employee in the Module explorer.
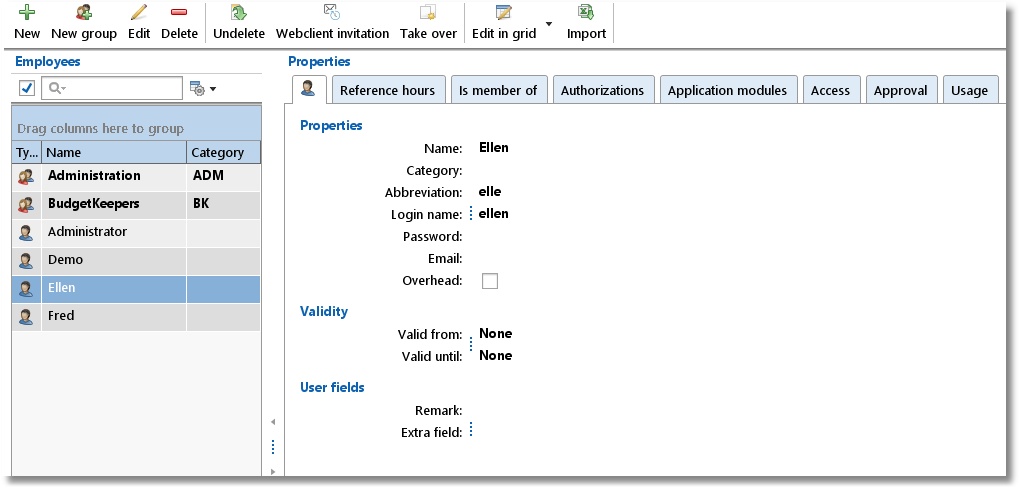
In the employee list, employee groups are shown with their name in bold and with a group image  .
.
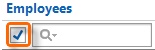 |
Invalid employees (no longer employed) are shown in red in the list. In lists the invalid items can be hidden by setting the checkbox left of the search box. Note: The checkbox value is a global setting. This means it will be applied to all list where this setting is available.
The search box above the list can be used to quickly look up employee details. |
|---|---|
 |
To the right side of the search box this button is available to adjust the column settings of the list, for example: column widths, expand or collapse groups or show/hide columns. |
For an employee you can enter the following details on the first tab:
Name |
Is shown in reports and when making hourly bookings. |
Category |
A category description, can be used in reports. |
Abbreviation |
Can be used in reports. |
Login name |
Name used by user to login. |
Password |
Password to be used to be able to login. |
Overhead |
Overhead can be used to indicate if an hourly booking for this employee is overhead or not. For employee as well for all other aspects (such as: Customer, Product, Activity) the overhead field is available. If one or more aspects are ticked as overhead the related hour bookings will also be overhead. This can be used later for filtering / limiting a report. |
Validity |
Used to set from .. until .. when an employee is valid (employed). You can hide invalid items in the list by selecting the checkbox left of the search box. |
User fields |
A number of user fields can be set up at Maintenance and settings | Fields. These can then be filled in here per employee. Data entered in user fields can also be used in reports. |
On the second tab Reference hours you can enter how many hours an employee should cover.
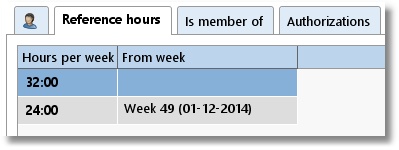
The example above of tab Reference hours shows that Ellen should book 32 hours up to week 49 in 2014 and 24 hours after that.
For an employee group you can enter the following details on the first tab:
Name |
Is shown in reports and, if applicable, as role when making hourly bookings. |
|---|---|
Category |
A category description, can be used in reports. |
Not for access |
Select if this employee group is not applicable to access. |
Not for authorizations |
Select if this employee group is not applicable to authorizations. |
Not for tariff agreements |
Select if this employee group is not applicable to tariff agreements. |
Not for budget auditing |
Select if this employee group is not applicable to budget auditing. |
Not for program modules |
Select if this employee group is not applicable to program modules. |
Managing the data is done through the buttons on the toolbar:
New |
Set up a new employee. |
New group |
Set up a new employee group. |
Edit |
Edit data for the selected employee or employee group. |
Delete |
Remove the selected employee or employee group. To retain data, the employee is not actually deleted but gets a ‘deleted’ marking. The employee will then no longer be able to login but is still shown in historical bookings and will still appear in reports. |
Undelete |
|
Web client invitation |
Invite the selected employee to use the TimeWriter web client via email with a personal link and QR code (only available when using the cloud database). |
Take over |
Take over all (group)memberships, authorisations, application module access and access from another employee or employee group. Existing settings will be deleted. |
Import |
Import employee data from an Excel file. See import. |
All of the buttons on the toolbar are also available in the main menu and under the right-click menu of the employee list. In the right-click menu you will also see what shortcut keys are available.
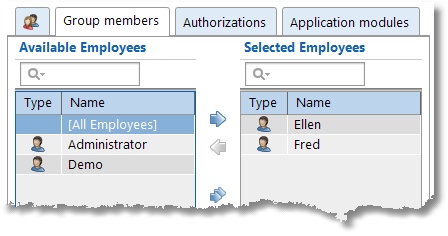
Filling an employee group with group members
Filling an employee group with employees can be done as follows:
1.Select an employee group.
2.Click on Edit.
3.Go to the Group members tab.
4.Move the employees, which have to be a member of the selected group, from left to right by using the arrow keys. Select, to link all employees in one go, the option [All employees] and move it to the right. The advantage of selecting this option is that you don't have to adjust the membership when new employees are entered.
Making employees member of an employee group
Making employees member of an employee group can be done as follows:
1.Select an employee.
2.Click on Edit.
3.Go to the Is member of tab.
4.Move the groups, of which the selected employee has to be a member, from left to right by using the arrow keys.
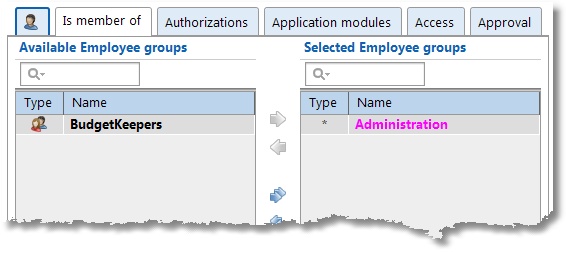
In the selected employee group list, groups for which [All employees] is selected are marked with an asterisk and shown in a magenta color. These type of membership can not be changed here but only on the Group members tab of the employee group.
Authorising employees and employee groups
An employee can be authorised to create hourly bookings for various aspects. Do this as follows:
| 1. | Select the employee or employee group. |
| 2. | Click on Edit. |
| 3. | Go to the Authorizations tab. |
| 4. | The Overview tab will show all of the already linked aspects. Click on  to link new aspects or to remove links. to link new aspects or to remove links. |
Linking of aspects can also be done via the Allocate tab of the aspect tabs themselves. Below you can see the Allocate tab of the ‘Customer’ aspect tab. Use this tab to see which customers or customer groups are already linked and all of the customers and customer groups that are still available. On the Effective tab all effective authorisations obtained directly as well as well as by group memberships are displayed.
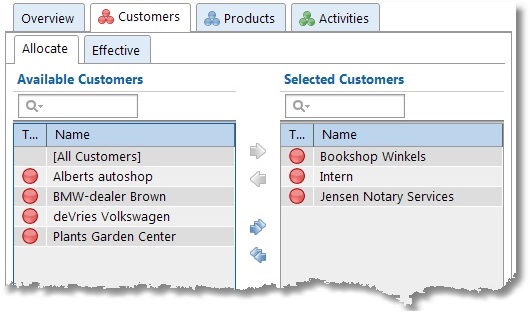
Customers and customer groups can be moved from left to right by using the arrows. This can also be done by clicking and dragging. To link all customers and customer groups in one go, select option [All Customers] and move it to the right. The advantage of selecting this option is that you don't have to adjust authorisations when new customers or customer groups are entered. The text box above the list can be used to quickly look up details.
TIP: Authorisations can also be set up in Customer, Product and Activity. So if a new activity is being added for instance, you do not need to set up separate authorisations for every employee but several employees can be authorised in one go.
Setting up application modules for employees and employee groups
For every employee or employee group access to every single program module can be set as follows:
1.Select an employee or employee group.
2.Click on Edit.
3.Go to the Application modules tab.
4.Select every application module the employee or employee group has access to.
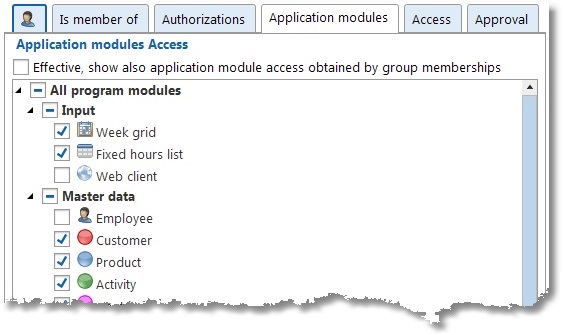
TIP: Employees can inherit the application module access via group memberships! Set the checkbox "Effective" to show the effective module access (not available for groups or in edit mode).
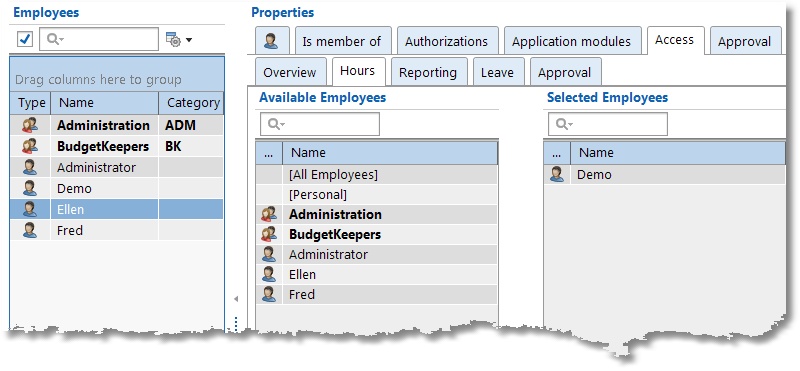
Setting up user access
Who has access to whose hours, reporting, leave or approval can be set up as follows:
1.Select the employee.
2.Click on Edit.
3.Go to the Access tab.
4.Select the Hours, Reporting, Leave or Approval tab.
In the selected tab (in the example below: Hours) there are three options:
| 1. | For employees who are to only see their own hours, select [Personal] from the list and move it to the right (Selected Employees) using the arrow keys. |
| 2. | For employees who are allowed to see all hourly bookings of all employees, select [All Employees] from the list and move it to the right (Selected Employees) using the arrow keys. |
| 3. | For employees who are allowed to see only certain hourly bookings of a limited number of employees or employee groups, select the employee(s) or employee group(s) concerned from the list and move the selection to the right (Selected Employees) using the arrow keys. The employee him-/herself should also be selected otherwise the employee will have no access to his/her own hours. |
Note: If desired approval access can, besides on employee, also be set based on one of the other aspects (see Settings | Approval).
Setting up approval for employees
For each employee some data concerning Approval can be set up as follows:
1.Select an employee.
2.Click on Edit.
3.Go to the Approval tab.
4.Enter the data as below:
Enter hours up to (not including) level: |
Select the approval level up to (not including) which the employee can edit an already approved hourly booking (this means that editing hourly bookings with this level or a higher level set is no longer allowed for this employee). |
|---|---|
Maximum approval level |
Select the maximum approval level the employee (if authorised for approval) can set. |
Can approve leave |
Select this option íf the employee (if authorised for leave) can approve leave. |
Set approval access based on aspect |
Select the aspect on the basis of which the access for approval must be set (personal setting). |