Basic user details are entered here. Booking access and general access levels for users can also be entered here. Select Master data | Employee in the Module explorer.
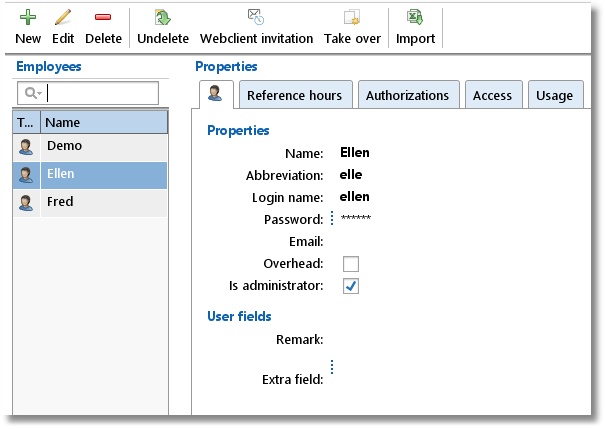
On the first tab you can enter the following details for your users:
Name |
Is shown in reports and when making hourly bookings. |
||||
Abbreviation |
Can be used in reports. |
||||
Login name |
Name used by user to login. |
||||
Password |
Password to be used to be able to login. |
||||
Overhead |
Overhead can be used to indicate if an hourly booking for this aspect is overhead or not. For Employee, Customer, Product and Activity the overhead field is available. If one or more aspects are ticked as overhead the related hours bookings will also be overhead. This can be used later for filtering / limiting a report. |
||||
Is Administrator |
With this option you can setup whether the employee is a TimeWriter administrator or not. Every employee can:
Administrators can also: •Manage master data. •Change system settings. •Create and edit reports. |
||||
User fields |
A number of user fields can be set up at Maintenance and settings | Fields. These can then be filled in here per employee. Data entered in user fields can also be used in reports. |
On the second tab Reference hours you can enter how many hours an employee should cover.
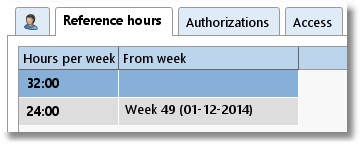
The example above of tab Reference hours shows that Ellen should book 32 hours up to week 49 in 2014 and 24 hours after that.
Managing the data is done through the buttons on the toolbar:
New |
Set up a new employee. |
|---|---|
Edit |
Edit data for the selected employee (Ellen). |
Delete |
Remove the selected employee. To retain data, the employee is not actually deleted but gets a ‘deleted’ marking. The employee will then no longer be able to login but is still shown in historical bookings and will still appear in reports. |
Undelete |
|
Web client invitation |
Invite the selected employee to use the TimeWriter web client via email with a personal link and QR code (only available when using the cloud database). |
Take over |
Take over all authorisations and access from another employee. Existing authorisations and access will be deleted. |
Import |
Import employee data from an Excel file. See import. |
Authorising employees
An employee can be authorised to create hourly bookings for various aspects. Do this as follows:
| 1. | Select the employee. |
| 2. | Click on Edit. |
| 3. | Go to the Authorizations tab. |
| 4. | The Overview tab will show all of the already linked aspects. Click on  to link new aspects or to remove links. to link new aspects or to remove links. |
Linking of aspects can also be done via the aspect tabs themselves. Below you can see the ‘Customer’ aspect tab. Use this tab to see which customers are already linked and all of the customers that are still available.
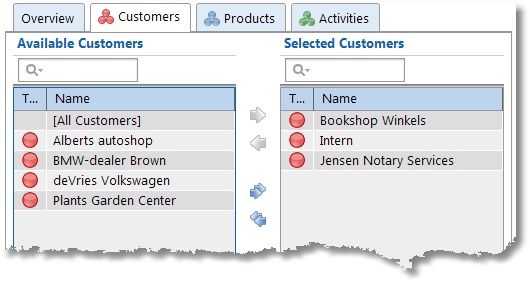
Customers can be moved from left to right by using the arrows. This can also be done by clicking and dragging. To link all customers in one go, select option [All Customers] and move it to the right. The advantage of selecting this option is that you don't have to adjust authorisations when new customers are entered. The text box above the list can be used to quickly look up details.
TIP: Authorisations can also be set up in Customer, Product and Activity. So if a new activity is being added for instance, you do not need to set up separate authorisations for every employee but several employees can be authorised in one go.
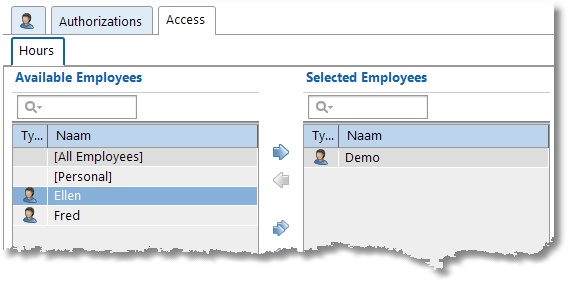
Setting up user access
Who has access to whose hours can be set up as follows:
| 1. | Select the employee. |
| 2. | Click on Edit. |
| 3. | Go to the Access tab. |
There are three options:
| 1. | For employees who are to only see their own hours, select [Personal] from the list and move it to the right (Selected Employees) using the arrow keys. |
| 2. | For employees who are allowed to see all hourly bookings of all employees, select [All Employees] from the list and move it to the right (Selected Employees) using the arrow keys. |
| 3. | For employees who are allowed to see only certain hourly bookings of a limited number of employees, select the employee(s) concerned from the list and move the selection to the right (Selected Employees) using the arrow keys. The employee him-/herself should also be selected otherwise the employee will have no access to his/her own hours. |